Beginner Crypto Lesson 02 – Understanding & Using Your Crypto Wallets

Continuing our beginner’s guide, in Lesson 01 you learned how to sign up for an exchange and purchase the Crypto of your choice.
Once you have made some purchases, what are some best practices and strategies to maximize your purchases?
Let’s dive in.
First of all, if your crypto is on an exchange that is called a “custodial wallet” which means you don’t have the keys to your wallet – the exchange does. I wrote about that in the posting: Understanding Custodial vs. Non-Custodial Crypto Wallets
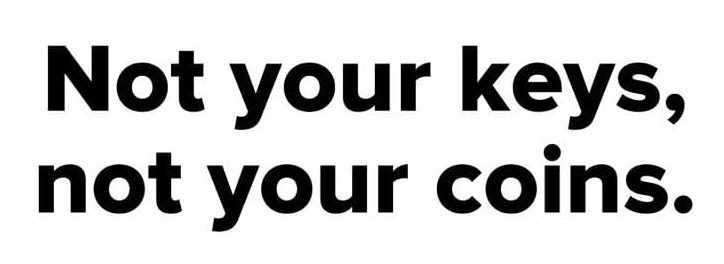
If you created a BlockFi or Voyager account as I recommended, those too are custodial wallets. But don’t forget – the message to be heard loud and clear is:
Why? Let’s look at an exchange from the past.
The Lesson of MT. Gox (Full Wikipedia Article)
Mt. Gox was a bitcoin exchange based in Shibuya, Tokyo, Japan. Launched in July 2010, by 2013 and into 2014 it was handling over 70% of all bitcoin (BTC) transactions worldwide, as the largest bitcoin intermediary and the world’s leading bitcoin exchange.
In February 2014, Mt. Gox suspended trading, closed its website and exchange service, and filed for bankruptcy protection from creditors. In April 2014, the company began liquidation proceedings
Mt. Gox announced that approximately 850,000 bitcoins belonging to customers and the company were missing and likely stolen, an amount valued at more than $450 million at the time. Although 200,000 bitcoins have since been “found”, the reasons for the disappearance—theft, fraud, mismanagement, or a combination of these—were initially unclear.
New evidence presented in April 2015 by Tokyo security company WizSec led them to conclude that “most or all of the missing bitcoins were stolen straight out of the Mt. Gox hot cryptocurrency wallet over time, beginning in late 2011.
I had just created an account in 2014 before the breach happened – but luckily never moved coins to it. Point being, I am going to make some recommendations about keeping coins on exchanges – I think they are much safer today – but buyer beware.
Ok, so you created your accounts at BlockFi and/or Voyager (As a reminder, Voyager has better interest rates but a waiting list, BlockFi has good rates and can be set up in a few minutes.) and connected your bank account.
And a quick reminder about Where NOT to buy Crypto: Robinhood & PayPal to Begin With.
Now you can buy the coins you are interested in and they will be in your online exchange wallet.
The next step is to get a non-custodial wallet – one that exists on your computer/phone where you have the private key (Seed Phrase) you WILL NEVER SHARE WITH ANYONE EVER.
I am going to recommend Exodus. Download it, install it, save your private key (Seed Phrase) that you WILL NEVER SHARE WITH ANYONE EVER.
Now that you have your own private wallet. If your laptop catches on fire you can get a new one, re-install Exodus, and rebuild your wallet with your seed phrase.
You can now send/transfer crypto from the exchange to your Exodus wallet.
- In Exodus go to SETTINGS (Top right gear icon)
- Search for the Assets you own on the exchange you chose
- Tick the box to the left to make it show up on your “homepage” list
- Go back to HOME (Top Left Blue X)
- Click on a coin
- Click RECEIVE to get your wallet’s address for that coin.
- Go to your online exchange and send the coin of your choice to that Exodus address!
- Keep in mind, you need to send ETH to ETH, BTC to BTC, etc.
- Once you initiate the transaction it will take a few moments until you hear “Ca-Ching!”
- Your coins are now in your own wallet.
As long as your computer doesn’t get hacked (unlikely) and you have your private key/seed phrase stored safely, your assets are pretty damn safe!
To make them even safer, in the next lesson I will talk about Cold Wallets. Literally, a fob (Thumb Drive) that you connect to your PC, transfer the coins to, disconnect and put in a safe place.
I will also talk about not moving all of your coins off of the exchange – because you can earn really good interest rates by storing them there.
If you have read the first two lessons and have questions please leave a comment below. I can update the existing posts as necessary or be aware of things I should address in the next few posts.
Lesson 3? Here you go!
Helpful? Useful? Enlightening?
Please consider making a small donation to CoinTutor.org. Any little bit helps the articles keep coming and the forums running. Pick a coin below, donate, and Thank You!
Bitcoin
Ethereum
Tether
Cardano
Xrp
Polkadot
Litecoin
Dogecoin
Usdcoin
Monero

Donate Bitcoin to this address
Scan the QR code or copy the address below into your wallet to send some Bitcoin

Donate Ethereum to this address
Scan the QR code or copy the address below into your wallet to send some Ethereum

Donate Tether to this address
Scan the QR code or copy the address below into your wallet to send some Tether

Donate Cardano to this address
Scan the QR code or copy the address below into your wallet to send some Cardano

Donate Xrp to this address
Scan the QR code or copy the address below into your wallet to send some Xrp

Donate Polkadot to this address
Scan the QR code or copy the address below into your wallet to send some Polkadot

Donate Litecoin to this address
Scan the QR code or copy the address below into your wallet to send some Litecoin

Donate Dogecoin to this address
Scan the QR code or copy the address below into your wallet to send some Dogecoin

Donate Usdcoin to this address
Scan the QR code or copy the address below into your wallet to send some Usdcoin

Donate Monero to this address
Scan the QR code or copy the address below into your wallet to send some Monero
Please Add coin wallet address in plugin settings panel
Add a comment
You must be logged in to post a comment.


